A collection of Cisco VIRL Installation Troubleshooting Common Issues. More will be added over time.
Cisco VIRL Installation Troubleshooting Common Issues
KVM-ok Check Failed
When deploying VIRL as a virtual machine, in our case we imported an “OVA” image to your VMware environment, whether it was a ESXi server, Windows PC or Mac computer. VIRL is running within a VMware hypervisor. Keep in mind that VIRL itself is also a VM host where the simulated routers (as VMs) are running inside. This is called “nested virtualization”. For this to function properly we need to be able to pass the CPU “flags” from the host to the VIRL virtual machine, two levels down. In essence tricking the simulated virtual routers inside VIRL to think they have direct access to the CPU.
Intel VT-x and AMD’s AMD-V are instruction set extensions that provide hardware assistance to virtual machine monitors. They enable running fully isolated virtual machines at native hardware speeds, with minimum overhead. In essence, it helps and supports nested virtualization.
On a Ubuntu/Linux based machine, we use “kvm-ok” command to check if VT-x is enabled and “KVM acceleration” can be used.
virl@virl:~$ sudo kvm-ok
INFO: /dev/kvm exists
KVM acceleration can be used
virl@virl:~$
If your KVM check fails as shown below, your system is not VT-x/EPT ready or hasn’t been enabled in BIOS yet. Follow the troubleshooting steps to resolve.
virl@virl:~$ sudo kvm-ok
INFO: Your CPU does not support
KVM extensions KVM acceleration can NOT be used.
Step 1: Check if CPU supports VT-x/EPT or AMD-v virtualization technology
Use this command in VIRL command line to show the CPU model on the server.
cat /proc/cpuinfo |grep 'model\|MHz\|proc'Reference Intel and AMD’s websites and verify if your CPU model has virtualization support.
Intel: Determine If My Processor Supports Intel® Virtualization Technology
AMD: Processors for Desktops, Laptops and Servers
A processor with Intel-VT does not guarantee that virtualization works on your system. It requires a computer system with a chipset, BIOS, enabling software and/or operating system, device drivers, and applications designed for this feature.
If the BIOS includes a setting to enable or disable support for Intel VT, make sure it is enabled. For Intel® Desktop Boards, enter the BIOS by pressing the F2 key as the system starts.
Step 2: Check BIOS settings
Once you confirmed that you have a CPU that supports virtualization technology, next to check if your motherboard supports it and it is enabled in BIOS settings. Usually most recent motherboards have virtualization support but cross check this information by reading the motherboard manual.
I’ve attached a few screenshots taken from different servers and PCs for your reference. The setting is typically located in System Services – Processor Settings.
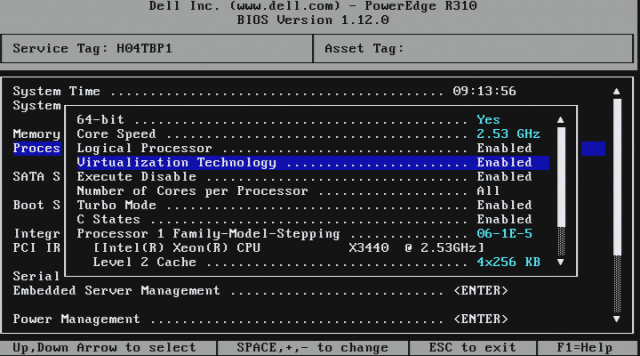
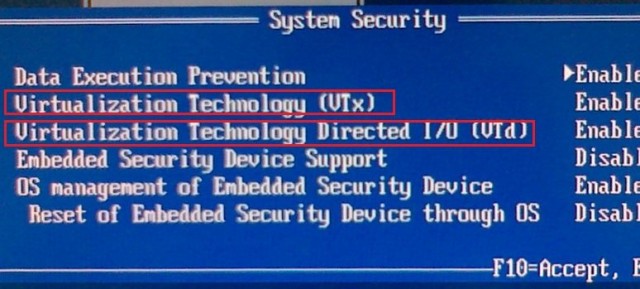
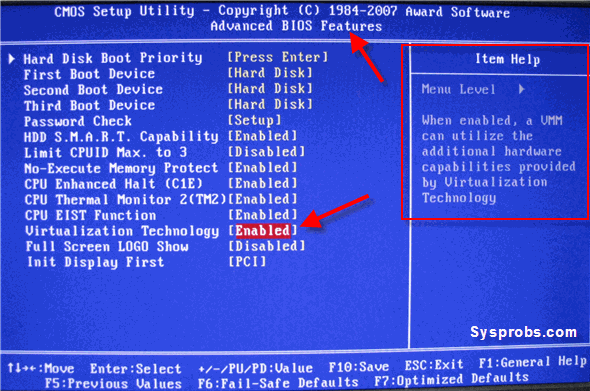
Step 3: Check .vmx configuration file
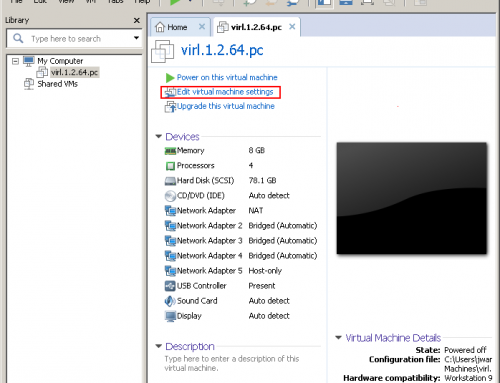
If all above have been verified and setup correctly, you need to make sure VIRL itself is configured to use VT-x. For some unexplained reason it is possible that the VT-x setting is not written to the configuration file of the VIRL VM. This can happen on VMWare Workstation or ESXi.
Locate the “VIRL.x.x.x.vmx” file in the directory where VIRL OVA was imported. In case of ESXi, check in the VM directory in datastore. There should be a file named “VIRL-x.x.x.vmx”. Download and open the file using a text editor. You will need to shut down the VIRL VM completely prior to editing the file. Otherwise the setting will not take effect.
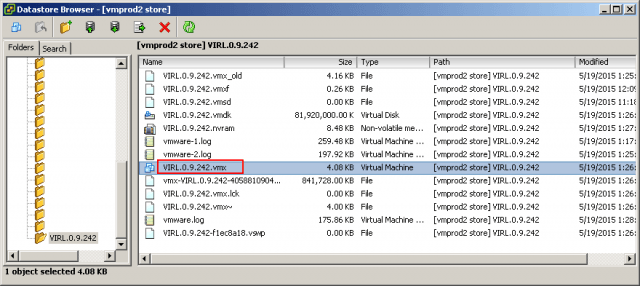
Ensure this line is present. Add this line if it does not exist already.
vhv.enable = "TRUE"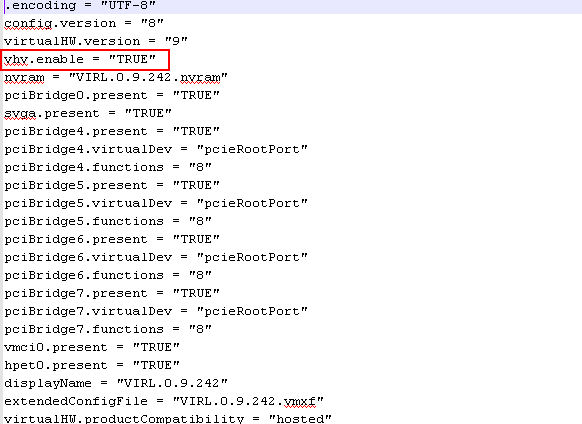
Save the file and restart VIRL VM.
Step 4: Verifications
Here are some additional commands used to troubleshoot the problem.
virl@virl:~$ sudo lsmod | grep kvm
virl@virl:~$ cat /proc/cpuinfo | sed -nre '/^flags/s/^.*(vmx).*$/\1/p'
On a Linux based systems, /proc/cpuinfo will tell you if the processor supports virtualization and if it is enabled.
cat /proc/cpuinfo | grep “vmx \| svm”We are essentially looking for “vmx” and “svm” flags. Here is what all the flags mean.
- vmx — Intel VT-x, basic virtualization
- svm — AMD SVM, basic virtualization
- ept — Extended Page Tables, an Intel feature to make emulation of guest page tables faster.
- vpid — VPID, an Intel feature to make expensive TLB flushes unnecessary when context switching between guests.
- npt — AMD Nested Page Tables, similar to EPT.
- tpr_shadow and flexpriority — Intel feature that reduces calls into the hypervisor when accessing the Task Priority Register, which helps when running certain types of SMP guests.
- vnmi — Intel Virtual NMI feature which helps with certain sorts of interrupt events in guests.
Verify AMD-V CPU virtualization extensions on a Linux
grep --color svm /proc/cpuinfoVerify Intel or AMD 64 bit CPU
grep -w -o lm /proc/cpuinfo | uniqOn a Ubuntu server the following commands can be used to verify VT-X is enabled.
lscpu | egrep 'Arch|On-Line|Vend|Virt'
egrep -wo 'vmx|ept|svm|npt|ssse3' /proc/cpuinfo | sort | uniq
License activation issues
It is normal that the VIRL server fails to connect to the SALT licensing servers for the first time or two. You often see errors “Failed to collect current salt contact status”. If it continues to fail, verify the following common issues:
You may be using an out-of-date SALT stack
Cisco has the history of changing the SALT servers several times in last year. It is recommended to double check the most recent SALT servers on Cisco VIRL website. At the time of writing, here are the servers you should use.
US SALT Servers
us-1.virl.info
us-2.virl.info
us-3.virl.info
us-4.virl.info
EU SALT Servers
eu-1.virl.info
eu-2.virl.info
eu-3.virl.info
eu-4.virl.info
You may have configured incorrectly
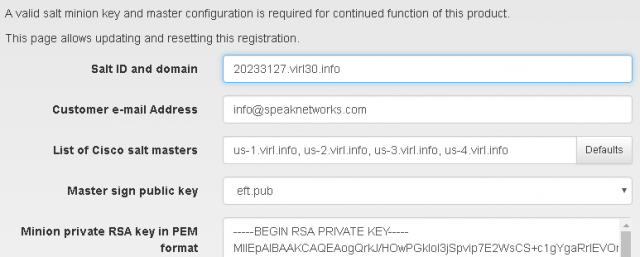
Pay attention to the exact information Cisco is expecting you to put in when activating a license.
Salt ID and domain: copy & paste the license file name, excluding the “.pem” extension. Valid entry examples are: “20233222.virl.info” for standard license and “202333222.virl30.info” for 30 node license.
Customer e-mail address: use the same email address in your Cisco.com account which you used to purchase VIRL.
List of Cisco Salt masters: you can configure multiple, separated by comma.
Master sign public key: always eft.pub. Do not change.
Minion private RSA key in PEM format: open the license “.pem” file using a plain text editor, such as Notepad. Copy & Paste everything.
Verify communication to SALT servers
SSH to VIRL server, use these commands to verify the communication between VIRL and the SALT servers.
virl@virl:~$ ping us-1.virl.info
virl@virl:~$ nc -zv us-1.virl.info 4505-4506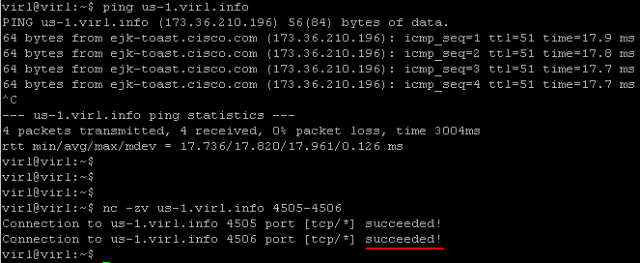
You should be able to ping the SALT servers and verify connectivity to TCP port 4505 and 4506. If the port testing fails, it is likely that a firewall or the Internet gateway is blocking outbound traffic over these ports. You’ll need to get it resolved before VIRL can be activated. If above testing worked fine, we need to dig deeper. The screenshots were taken from a working VIRL server. If you did you reveal similar outputs, there is an issue that you need to troubleshoot.
Check time has been synchronized with one of the public NTP servers. VIRL requires NTP working properly.
virl@virl:~$ ntpq –p
virl@virl:~$ date
Attempt to resolve the SALT server names and connect to the master servers.
sudo salt-minion -l debug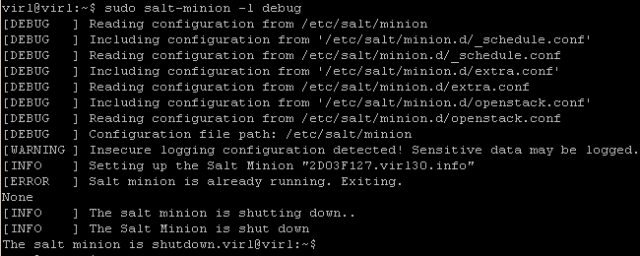
Display the license ID you configured on the server.
virl@virl:~$ sudo salt-call --local grains.get id
local:
2D09F127.virl30.info
Check you can authenticate your server. It should return “True”.
virl@virl:~$ sudo salt-call -l debug test.ping
local:
True
Here are Cisco VIRL Installation Troubleshooting Common Issues.


thanks a mill for the article – helped a lot!